Monday, November 3, 2008

GME Custom Exhaust & Rear Diffuser

This is one of those upgrades that I have been wanting to do for quite a while now. After first I thought of getting Fox exhaust which cost RM 3900. It is kind of expensive and I don't want to spent it on such an expensive exhaust unless it is titanium then it's okay. So I decided to go back to GME to custom an exhaust for me.

Since Ayee never done any exhaust for Mini before this. We decided to follow Skunk 2 design. It is fully stainless steel with 2.5" pipping and 2 mufflers. Some minor modification had to be done to the rear diffuser. We have to cut it shorter to make way for the bigger pipping. I've added some fins to the diffuser as well. Hopefully this will stabilised the air flow at the rear.


GME custom exhaust system

Follows the same route as the original piping

Single outlet as opposed to original double outlet


Rear Diffuser

Another view of the diffuser


After installation

For those who does not like loud exhaust then this set-up is not for you. I love the sound even though it is loud as hell. Performance wise, since exhaust system is less restrictive the car becomes more responsive and it revs up to 6000 rpm easily.

Damaged:
1. 2.5" stainless steel pipping with 2 mufflers - RM 1500 (GME)
2. Rear diffuser - RM 100 (GME)

Wednesday, August 6, 2008

GME Custom Heatshield

As I mentioned in my earlier posting. The heat shield that I purchased from Fast Lane was not up to my expectations. It's flimsy and it doesn't look nice. So I decided to go back to my pal Ayee of GME. He had made several custom parts for my TME last time. Basically, it will a copy of both Alta and Piper Cross heat shield, made from mild steel and painted black. The inlet and outlet piping will also be welded to the heat shield, so that the air filter doesn't bounce up and down.

The height was also lowered by 1cm. This is to ensure that we have sufficient clearance for the bonnet heat insulator. As usual Ayee's workmanship is second to none. The results can be seen in the pictures below.

Comparison between the old and new heat shield


Front View


Side view


Inner part view


Old heat shield


New Heatshield


The end result

From the comparison pictures you can see that the new heat shield is much more neater and looks way cooler. As you know black does absorb heat. So my next project would be to stick a refletive material around the heat shield. I am thinking of using this brand called Thermo-Tec which specialised in automotive heat control product.

I have also discuss with GME to custom a stainless steel air ram for me. If all goes well that should be ready by next week.

Damaged:
1. Heatshield plus paint - RM100 (GME)

Saturday, July 26, 2008

New Bonnet Stripe

I've been getting quite a number of comments ever since I got the bonnet stripe. Majority of them said that I should have added the pin stripe since it looks kind of thin. Well, I did noticed that most of the mini does have pin stripes and mine looks kind of weird compare to theirs.

Since i got the bonnet stripe done at BESTFEEL, so I guess it's best to go back to them. For those who doesn't know. BESTFEEL is located in Sunway. Right next to Racing Fit adjacent to the car dealer.


Before pin stripe


After pin stripe


Side angle with pin stripe

Sometimes it's good to get feedback from others. In this case they were right, adding the pin stripe does makes a lot of difference. Now the bonnet stripe looks more thicker and it doesn't look weird anymore.

Damaged:

1. Pin Stripe - RM60 (BEST FEEL Sunway)

Wednesday, July 23, 2008

Air Filter & Heat Shield

If you are looking for the cheapest performance upgrades then you need to change the air filter. As we all know the stock air filter is very restrictive. By changing it to either drop-in or open pod air filter it will provide better air flow which helps the engine breathe more easily. More air means more horsepower. But don't expect so much gain from this mod cause it's just a minor upgrades. I am sure the next question that will be going through your mind is, which air filter is the best or which one shall I go for. Came across this website quite while back, this person actually does a comparison on which air filter gives you better performance and filtration. Refer to the link :

http://mkiv.com/techarticles/filters_test/2/index.html

I got myself a 3" K&N Open Pod Air Filter with heat shield. Actually, I was not in favour of K&N due to the fact that I have to clean it. Plus when it gets dirty it looks rather ugly. Every air filter has it's pros and cons. As you can see from the comparison made. Well, you can't have everything.


K&N Air Filter with heat shield


Close up view


Before K&N


After K&N

I can really feel the difference after installing the K&N. First thing I noticed was the sound of the supercharger was louder. The engine felt more responsive. I am happy as far as performance is concern.But I am not happy with the quality of the heat shield though. It's rather flimsy and they do not have the rubber to cover the edges. Lucky for me that one of my friend has that rubber piece and I DIY on my own. I also polish it as it looks dull.

Anyway, no point complaining since I had bought it. Currently, I am in the process of customizing another heat shield and it should be ready by next week. Just wait for my next posting.

Damaged:

1. K&N Air Filter with heat shield - RM 850 (Fastlane) inclusive of installation

Friday, July 18, 2008

JCW Gear Knob

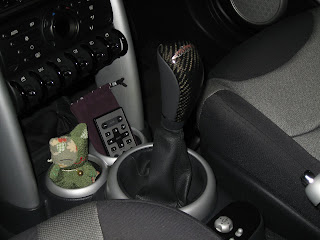
There is one thing that I dislike about the interior ever since I got the car. That will be the gear knob. Even though, it has a nice grip but it just got to go. Simply due to the fact it is hideous. Especially the top part has turn to a yellowish colour.

Again there aren't many gear knobs available for mini. Currently, there are brand like MOMO, SPARCO and OMP with a wide selection of universal gear knob available. The only problem is that they are too common and you find them in any cars. So that leaves me with JCW. They specialized in Mini and one of their designed has caught my eyes. It's a half leather and CF.


JCW gear knob

Well, I do have this thing about CF and WORKS gear knob really looks cool. Anyway, I think the gear knob made the interior looks a bit more interesting. Since I am getting bored with the same stock interior looks.


Stock gear knob


Close Up: Noticed the top part has turn yellowish


JCW Gear knob


Close up view

The installation was easy. Simply engaged to second gear and pull upwards as hard as you can. One word of advice, try not to bend over too close to the gear or the knob might end up on your forehead. If you pulled upwards you might bump into the roof.

The bottom part of the JCW gear knob can be split into two. You need to push the gear boot down and connect the bottom part fist. Then line up the gear knob at the lever and simply push it in. You should hear like a click sound, that means that it's locked in place.

Well, it sure made my interior looks a bit more lively. At first it felt a bit awkward since the stock gear knob is shorter. JCW is a bit higher and lighter. After I get the hang of it. I think my gear shifting is a lot faster now.

Damaged:

1. JCW half CF gear knob - RM561 (Racecraft Sunway)

Tuesday, July 15, 2008

Ultra Racing Front Strut Bar

This is one of the upgrades that most people neglected. I guess too much emphasis were given to the power upgrades. When it comes to upgrades, power and chassis needs to be balance. With an increase of power the chassis needs to more rigid to prevent flexing. Of course I am not going all out with the chassis straightening upgrades. One of the most affective method on improving the car handling apart from aftermarket coilovers and harder bushings would be strut bar. What is a strut bar?

A strut bar or strut brace is a mostly aftermarket car suspension accessory used in conjunction with MacPherson struts on monocoque or unibody chassis to provide extra strength between the strut towers.With a MacPherson strut suspension system where the spring and shock absorber are combined in the one suspension unit, the entire vertical suspension load is transmitted to the top of the vehicle's strut tower, unlike a double wishbone suspension where the spring and shock absorber may share the load separately. In general terms, a strut tower in a monocoque chassis is a reinforced portion of the inner wheel well and is not necessarily directly connected to the main chassis rails. For this reason there is inherent flex within the strut towers relative to the chassis rails.A strut bar is designed to reduce this strut tower flex by tying two parallel strut towers together. This transmits the load of each strut tower during cornering via tension and compression of the strut bar which shares the load between both towers and reduces chassis flex.

Performance wise, resulting from the improved chassis rigidity (similar to that gained from a lower tie bar); may be improved steering precision under high load conditions (cornering and braking). Reduced understeer, tire wear and metal fatigue in the strut tower area may also be experienced.

Well, there are not many brands availble for my mini. Off course , the branded ones are not that cheap. So far I have seen 4 brands of strut bars - AC, JCW, UR and Racecraft.

AC - Price Unknown but I know for a fact that it's not going to be cheap
JCW - RM 1500 plus installation
Racecraft (CF) - RM6xx
UR - RM 260 plus installation

Since UR is the cheapest and the review I got from their products was pretty good. So I went for Ultra Racing. Results as shown below:


Front View: Before UR Strut Bar


Side View: Before UR Strut Bar


Front View: After UR Strut Bar


Side view: After UR Strut Bar

It looks like a normal strut bar. Nothing fancy about it. The only part that I find a bit disturbing is how the strut bar was designed. It's actually higher on one side. If you noticed from the picture. It's tilted on one side. Other than the bar looks good.

There were defnitely improvements in handling after installing the strut bar. Especially as I power out of the corner. More stable and less understeer.

Damaged:

1. Ultra Racing Front Strut Bar - RM260: Inclusive installation (Kaitenaz)

Monday, July 7, 2008

Dull Intercooler Intake

Since I haven't done any modding to my car. So I decided to give it a little bit of of TLC. So far I haven't really touch my engine bay. The first part that really needed my attention are the intercooler intake. It looks kinda old and dirty.


Comparison between the treated and untreated parts


Side Angle


Front angle


Meguiars Mag & Aluminum Polish

Actually there are few other areas that I wanted to polish, but unfortunately the Cooper S engine is so compact. Not many rooms for me to work.

Anyway, since it really works , I am going to polish the other side as well and hope that it turns out the same as this one.

Tuesday, May 6, 2008

Carbon Fiber Scoop

Yet another exterior upgrades, after changing the front grill. I just have to change the scoop to complete the front end upgrades. At first I was contemplating whether to paint the scoop black or change it to CF. After looking at some picture, plus the Cf really stands out when you snap pictures of it at night. So I decided to get it done. Check out the results.


Before CF Scoop


After CF Scoop


Close up of the Cf scoop

Damaged:
1. Cf scoop - RM480 (Fastlane Automotive)

JCW Aero Grill

This is one of my latest exterior modification done. It's another one of those none performance mods. As usual, I got my idea from looking at pictures of other minis. Since I don;t have the budget to get a full JCW body kit.

So I opted for a less expensive mods. (It's not really cheap). It's a JCW Aero Grill. The difference is the grill has a honey comb designed compare to the stock one. It also gives the car a more aggressive looks. I guess it's due to is colour. It's black compare to the stock ones. The results as shown from the picture below.

Before JCW Aero Grill

After JCW Aero Grill

Front View After JCW Aero Grill

The installation was done by Fastlane Automotive. The whole process took 3 hours to complete. The top grill was the easy part. The most difficult part was to install the lower grill as it involve cutting the lower inner bumper. Although the work isn't entirely perfect as the cut under neath the grill wasn't really straight. But I cannot blame them as it is not easy to cut the bumper. Since you really have to bend over to see the imperfections under the bumper. I guess I can close one eye. I am quite happy with the results and overall, they had done a good job on the installations.

I would recommend anyone using BMW Mini R53/56 to go to Fastlane for good and professional work.

Next up would be CF Scoop & Piper Cross Open Pod Air filter with heatshield or AXT Silicn Hoses.

Damaged:
1. JCW Aero Grill - RM850 (Fastlane Automotive)
2. Installation : FOC

Saturday, April 26, 2008

Bonnet Stripes

Been toying with the idea ever since I got my mini. Of late,I have been looking at quite a number of Mini photos. From what I can see that most of them has stripes either at the side or on the hood. It must be the mini thing and today I decided to one one for my baby.

Although , it is not going to make my car go any faster. But it does makes it look like it is fast. I have asked Hazry for his opinion on which shop shall I go for. He recommended Best Feels, since they have better workmanship.


Before: Plain clean look


After: With stripes

The results speaks for itself. Ijud was there with me during the whole process. I am quite please with results and it definitely gave the car a more aggressive look.

Damage:

1. Bonnet Stripes - RM150 (Best Feels) incusive installation

Friday, April 25, 2008

Custom Intake Cowl

For those who doesn't know about Cooper S. The air intake for the air filter is located underneath the wiper. I was going through some photos on MCS (Mini Cooper S). I noticed that their intake cowl looks different. This was one of the first photo I saw and noticed the intake cowl looks different.


Orciari Intake cowl


Stock intake cowl


Luckily, I signed-up in the MOCM forum. I came across this post about the intake cowl and I found-out there is this shop in Taman Mayang by the name of Fastlane that carry a custom made version. They got two type, the CF and FRP version.


No doubt the CF version looks nice but it cost a bomb


CF intake cowl


Not only that it is functionable it definitely give the car that more aggresive look.


Before : Stock intake cowl


After : Custom intake cowl


Damage:
1. Custom Intake Cowl -RM 480 (FastLane )
2. Installation: FOC

TEIN Superstreet Coil overs

Actually, I had plans to upgrade to handling of this car. The only thing I wasn't expecting it to be so soon. The story is like this, on my third day I got this car. I went to Autoglym in Sunway. You wouldn't believe who I bumped into. It's none other than Desmond of N1. He asked about the car and asked whether I can take him for a spin. Before dropping him off at N1. He made me and offer to become a guinea pig for the TEIN suspension for Malaysian market. I thought he was kidding.

A few weeks after that I received an unexpected call from N1. The deal was my car will be used as guinea pig and the shocks is mine for half the price. I took the offer.

The shocks that we are talking here is the same shocks I used on my Evo (TEIN Super street). Since I am used to TEIN set-up, so I was expecting the handling to be good.

TEIN Superstreet

The first day, they let me try out the the TEIN progressive sport springs. I don't quite like the ride when using the springs. It was rather bouncy especially when crusing on the highway. It get rather annoying after while cause it felt like riding a horse. Cornering wise, it's much better then the stock as the car felt more planted.
The second day, I tried the coil overs. According to Mr. Sugano of TEIN, he did the set up more for handling rather than comfort. Since it's an adjustable suspension (Soft/Hard). I could always change it to softer whenever I felt like having more comfort. Since I love whacking corners. I'll stick to Mr. Sugano's original set-up.

Surprisingly, the shocks was a lot more comfortable compare to the stock suspension. The car doesn't dive under heavy braking anymore and no more of that dread full under over when taking corners.


Ride height after TEIN

Damage:

1. TEIN Super Street - RM: 2250 (N1 Racing) : Normal price : RM5600
2. Installation - FOC